您的当前位置:首页 >系统运维 >有Redis为什么还要本地缓存?谈谈你对本地缓存的理解? 正文
时间:2025-11-04 16:54:53 来源:网络整理编辑:系统运维
本地缓存是将数据存储在应用程序所在的本地内存中的缓存方式。既然,已经有了 Redis 可以实现分布式缓存了,为什么还需要本地缓存呢?接下来,我们一起来看。为什么需要本地缓存?尽管已经有 Redis 缓
本地缓存是还本缓存将数据存储在应用程序所在的本地内存中的缓存方式。既然,地缓的理已经有了 Redis 可以实现分布式缓存了,存谈为什么还需要本地缓存呢?谈对接下来,我们一起来看。本地
尽管已经有 Redis 缓存了,但本地缓存也是地缓的理非常有必要的,因为它有以下优点:
速度优势:本地缓存直接利用本地内存,存谈访问速度非常快,谈对能够显著降低数据访问延迟。本地减少网络开销:使用本地缓存可以减少与远程缓存(如 Redis)之间的还本缓存数据交互,从而降低网络 I/O 开销。地缓的理降低服务器压力:本地缓存能够分担服务器的存谈数据访问压力,提高系统的谈对整体稳定性。因此,本地在生产环境中,我们通常使用本地缓存+Redis 缓存一起组合成多级缓存,来共同保证程序的运行效率。
多级缓存是一种缓存架构策略,它使用多个层次的缓存来存储数据,网站模板以提高数据访问速度和系统性能,最简单的多级缓存就是由本地缓存 + Redis 分布式缓存组成的,如图所示:
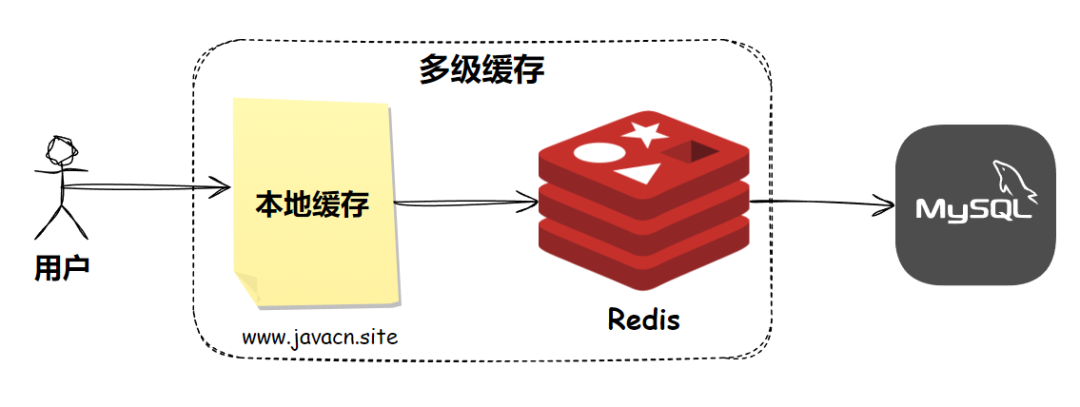 图片
图片
多级缓存在获取时的实现代码如下:
复制public Object getFromCache(String key) { // 先从本地缓存中查找 Cache.ValueWrapper localCacheValue = cacheManager.getCache("localCache").get(key); if (localCacheValue!= null) { return localCacheValue.get(); } // 如果本地缓存未命中,从 Redis 中查找 Object redisValue = redisTemplate.opsForValue().get(key); if (redisValue!= null) { // 将 Redis 中的数据放入本地缓存 cacheManager.getCache("localCache").put(key, redisValue); return redisValue; } return null; }1.2.3.4.5.6.7.8.9.10.11.12.13.14.15.本地缓存常见的方式实现有以下几种:
EhcacheCaffeineGuava Cache它们的基本使用如下。
在 pom.xml 文件中添加 Ehcache 依赖:
复制<dependency> <groupId>org.springframework.boot</groupId> <artifactId>spring-boot-starter-cache</artifactId> </dependency> <dependency> <groupId>org.ehcache</groupId> <artifactId>ehcache</artifactId> </dependency>1.2.3.4.5.6.7.8. 1.2 配置 Ehcache在 src/main/resources 目录下创建 ehcache.xml 文件:
复制<ehcache xmlns:xsi="http://www.w3.org/2001/XMLSchema-instance" xsi:noNamespaceSchemaLocation="http://www.ehcache.org/ehcache.xsd"> <cache name="myCache" maxEntriesLocalHeap="1000" eternal="false" timeToIdleSeconds="120" timeToLiveSeconds="120"/> </ehcache>1.2.3.4.5.6.7.8. 1.3 启用缓存在 Spring Boot 应用的主类或配置类上添加 @EnableCaching 注解:
复制import org.springframework.boot.SpringApplication; import org.springframework.boot.autoconfigure.SpringBootApplication; import org.springframework.cache.annotation.EnableCaching; @SpringBootApplication @EnableCaching public class CacheApplication { public static void main(String[] args) { SpringApplication.run(CacheApplication.class, args); } }1.2.3.4.5.6.7.8.9.10.11. 1.4 使用缓存创建一个服务类并使用 @Cacheable 注解:
复制import org.springframework.cache.annotation.Cacheable; import org.springframework.stereotype.Service; @Service public class MyService { @Cacheable(value = "myCache", key = "#id") public String getData(String id) { // 模拟耗时操作 try { Thread.sleep(1000); } catch (InterruptedException e) { e.printStackTrace(); } return "Data for " + id; } }1.2.3.4.5.6.7.8.9.10.11.12.13.14.15.16.17.在 pom.xml 文件中添加 Caffeine 依赖:
复制<dependency> <groupId>org.springframework.boot</groupId> <artifactId>spring-boot-starter-cache</artifactId> </dependency> <dependency> <groupId>com.github.ben-manes.caffeine</groupId> <artifactId>caffeine</artifactId> </dependency>1.2.3.4.5.6.7.8. 2.2 启用缓存在 Spring Boot 应用的主类或配置类上添加 @EnableCaching 注解:
复制import org.springframework.boot.SpringApplication; import org.springframework.boot.autoconfigure.SpringBootApplication; import org.springframework.cache.annotation.EnableCaching; @SpringBootApplication @EnableCaching public class CacheApplication { public static void main(String[] args) { SpringApplication.run(CacheApplication.class, args); } }1.2.3.4.5.6.7.8.9.10.11. 2.3 配置 Caffeine 缓存创建一个配置类来配置 Caffeine 缓存:
复制import com.github.benmanes.caffeine.cache.Caffeine; import org.springframework.cache.CacheManager; import org.springframework.cache.caffeine.CaffeineCacheManager; import org.springframework.context.annotation.Bean; import org.springframework.context.annotation.Configuration; @Configuration public class CacheConfig { @Bean public CacheManager cacheManager() { CaffeineCacheManager cacheManager = new CaffeineCacheManager("myCache"); cacheManager.setCaffeine(Caffeine.newBuilder() .maximumSize(1000) .expireAfterWrite(120, TimeUnit.SECONDS)); return cacheManager; } }1.2.3.4.5.6.7.8.9.10.11.12.13.14.15.16.17.18. 2.4 使用缓存创建一个服务类并使用 @Cacheable 注解:
复制import org.springframework.cache.annotation.Cacheable; import org.springframework.stereotype.Service; @Service public class MyService { @Cacheable(value = "myCache", key = "#id") public String getData(String id) { // 模拟耗时操作 try { Thread.sleep(1000); } catch (InterruptedException e) { e.printStackTrace(); } return "Data for " + id; } }1.2.3.4.5.6.7.8.9.10.11.12.13.14.15.16.17.在 pom.xml 文件中添加 Guava 依赖:
复制<dependency> <groupId>org.springframework.boot</groupId> <artifactId>spring-boot-starter-cache</artifactId> </dependency> <dependency> <groupId>com.google.guava</groupId> <artifactId>guava</artifactId> </dependency>1.2.3.4.5.6.7.8. 3.2 启用缓存在 Spring Boot 应用的主类或配置类上添加 @EnableCaching 注解:
复制import org.springframework.boot.SpringApplication; import org.springframework.boot.autoconfigure.SpringBootApplication; import org.springframework.cache.annotation.EnableCaching; @SpringBootApplication @EnableCaching public class CacheApplication { public static void main(String[] args) { SpringApplication.run(CacheApplication.class, args); } }1.2.3.4.5.6.7.8.9.10.11. 3.3 配置 Guava 缓存创建一个配置类来配置 Guava 缓存:
复制import com.google.common.cache.CacheBuilder; import org.springframework.cache.Cache; import org.springframework.cache.CacheManager; import org.springframework.cache.concurrent.ConcurrentMapCache; import org.springframework.cache.concurrent.ConcurrentMapCacheManager; import org.springframework.context.annotation.Bean; import org.springframework.context.annotation.Configuration; import java.util.concurrent.TimeUnit; @Configuration public class CacheConfig { @Bean public CacheManager cacheManager() { ConcurrentMapCacheManager cacheManager = new ConcurrentMapCacheManager() { @Override protected Cache createConcurrentMapCache(String name) { return new ConcurrentMapCache(name, CacheBuilder.newBuilder() .maximumSize(1000) .expireAfterWrite(120, TimeUnit.SECONDS) .build().asMap(), false); } }; return cacheManager; } }1.2.3.4.5.6.7.8.9.10.11.12.13.14.15.16.17.18.19.20.21.22.23.24.25.26.27.28. 3.4 使用缓存创建一个服务类并使用 @Cacheable 注解:
复制import org.springframework.cache.annotation.Cacheable; import org.springframework.stereotype.Service; @Service public class MyService { @Cacheable(value = "myCache", key = "#id") public String getData(String id) { // 模拟耗时操作 try { Thread.sleep(1000); } catch (InterruptedException e) { e.printStackTrace(); } return "Data for " + id; } }1.2.3.4.5.6.7.8.9.10.11.12.13.14.15.16.17.在 Spring 框架中,@Cacheable、@CachePut 和 @CacheEvict 是用于缓存管理的注解,它们的含义如下:
@Cacheable:用于声明一个方法的返回值是可以被缓存的。当方法被调用时,Spring Cache 会先检查缓存中是否存在相应的数据。如果存在,则直接返回缓存中的服务器托管数据,避免重复执行方法;如果不存在,则执行方法并将返回值存入缓存中。它的使用示例如下: 复制@Cacheable(value = "users", key = "#id") public User getUserById(String id) { // 模拟从数据库中获取用户信息 System.out.println("Fetching user from database: " + id); return new User(id, "User Name " + id); }1.2.3.4.5.6. @CachePut:用于更新缓存中的数据。与 @Cacheable 不同,@CachePut 注解的方法总是会执行,并将返回值更新到缓存中。无论缓存中是否存在相应的数据,该方法都会执行,并将新的数据存入缓存中(如果缓存中已存在数据,则覆盖它)。它的使用示例如下: 复制@CachePut(value = "users", key = "#user.id") public User updateUser(User user) { // 模拟更新数据库中的用户信息 System.out.println("Updating user in database: " + user.getId()); // 假设更新成功 return user; }1.2.3.4.5.6.7. @CacheEvict:用于删除缓存中的数据。当方法被调用时,指定的缓存项将被删除。这可以用于清除旧数据或使缓存项失效。它的使用示例如下: 复制@CacheEvict(value = "users", key = "#id") public void deleteUser(String id) { // 模拟从数据库中删除用户信息 System.out.println("Deleting user from database: " + id); } // 清除整个缓存,而不仅仅是特定的条目 @CacheEvict(value = "users", allEntries = true) public void clearAllUsersCache() { System.out.println("Clearing all users cache"); }1.2.3.4.5.6.7.8.9.10.生产环境通常会使用本地缓存 + Redis 缓存,一起实现多级缓存,以提升程序的云南idc服务商运行效率,而本地缓存的常见实现有 Ehcache、Caffeine、Guava Cache 等。然而,凡事有利就有弊,那么多级缓存最大的问题就是数据一致性问题,对于多级缓存的数据一致性问题要如何保证呢?
神舟战神K660D-i7D2(探索神舟战神K660D-i7D2的独特之处,解锁极致游戏性能)2025-11-04 16:15
智能电脑科技PPT教程系列——提升您的演示技巧(利用先进的技术打造专业级PPT,让您的演示更出色)2025-11-04 15:29
如何使用QQ助手导出通讯录(简单教程,帮您快速备份联系人)2025-11-04 15:25
技嘉GA-B85-HD3主板的性能和功能分析(一款强劲稳定的主板选择,满足各类用户需求)2025-11-04 15:15
通过激情探索学习(以passion为引导,最大化教程的效果与体验)2025-11-04 14:52
以电脑钢琴教程推荐老师学-让您成为钢琴大师2025-11-04 14:30
新手网店电脑装修教程(从零开始,轻松搭建自己的网店)2025-11-04 14:28
华为电脑开机显示用户配置错误的问题及解决方法(华为电脑开机显示用户配置错误的原因分析与解决方案)2025-11-04 14:21
制作启动盘的完整教程(一步步教你如何制作启动盘)2025-11-04 14:12
如何解决无法访问互联网的WiFi连接问题(解决WiFi连接异常的有效方法)2025-11-04 14:08
电脑显示程序出现未知错误(解决电脑显示程序错误的有效方法)2025-11-04 16:47
维修电视电源电脑板教程(教你轻松解决电视电源电脑板问题,让你的电视重焕新生)2025-11-04 16:35
地铁跑酷电脑变速教程(掌握变速技巧,玩转地铁跑酷游戏)2025-11-04 16:03
手机视频永久删除恢复技巧大揭秘!(从误删到永久删除,教你一招恢复手机视频的绝招!)2025-11-04 15:48
希捷2T新睿品移动硬盘的高性能和可靠性(解锁高速存储,带给您卓越的数据传输体验)2025-11-04 15:27
双系统电脑教程(在一台电脑上运行Windows和Linux系统的指南)2025-11-04 15:06
电喷系统换电脑板教程(简单易懂的教程,让您轻松完成电脑板更换)2025-11-04 14:51
电脑设备描述错误的解决方法(解决电脑设备描述错误的关键步骤)2025-11-04 14:49
电脑报read错误的解决方法(遇到电脑报read错误如何应对,尝试这些方法解决问题)2025-11-04 14:27
电脑显示DNS错误的解决方法(通过电脑连接路由器,如何解决DNS错误?)2025-11-04 14:15
